Monday, March 31, 2014

Back to the Rudder

Not much to report, but I left the CPES to cure for the full 2 days as recommended and moved on to the first of many rudder laminations.  My plan is to do 1 layer of 1708 biaxial on the flat sides of the rudder and then do a single layer of 6 ounce cloth in the channel where the rudder shafts are to attach (I don't think 1708 will conform to the shape very well.  The shaft will be butted up directly against this layer so I don't see any need for additional protection.  I haven't fully worked out what I'll do on the trailing edge; the 1708 certainly won't wrap around, but I haven't tried the 6 ounce yet to see.

After I work out those details and I work my way around the rudder, I will add an additional layer of 6 ounce on top of the 1708 on the flat areas before beginning fairing and fitting the welded strap bolts on the upper shaft.  In any event, I got one side glued up over the weekend with 1708 and a new epoxy (Jamestown Distributors Total Boat).  It seemed to work out nicely but it was a little hard to wet out the 1708 fully.  This may be related to temperature though because it was pretty cold in the shop (~55 F - ish). I had warmed up the epoxy prior to using, but the rudder itself may have been cold enough to inhibit flow a bit.  Nothing to worry about, but it just made for some slow going.

With any luck I will have time to do the other side tonight and then start on the 6 ounce cloth in the shaft channel and the trailing edge of the rudder later this week.

First coat, first side done, you can see the dimples where the bolt pockets are.  Those will be faired before the next layer goes on.


Thursday, March 27, 2014

The Good Kind Of Messy


The rudder project is coming along nicely, but one of my fellow boat restoration compatriots suggested that I coat the rudder with some penetrating epoxy (CPES) prior to encapsulating the plywood with biaxial cloth.  I thought it was a really good idea since plywood (marine or otherwise) just doesn't hold up when immersed in water and figured it certainly couldn't hurt to treat the plywood even though no water should be seeping into it once it's finished.

The problem with CPES is that it takes 2 days to cure and unlike regular epoxy that's arguably better to re-coat while still green, CPES needs to have all of the volatile solvents evaporate prior to re-coating and risk trapping them underneath the next layer and causing problems.  That's what I've read on the internet anyway, so it must be true.
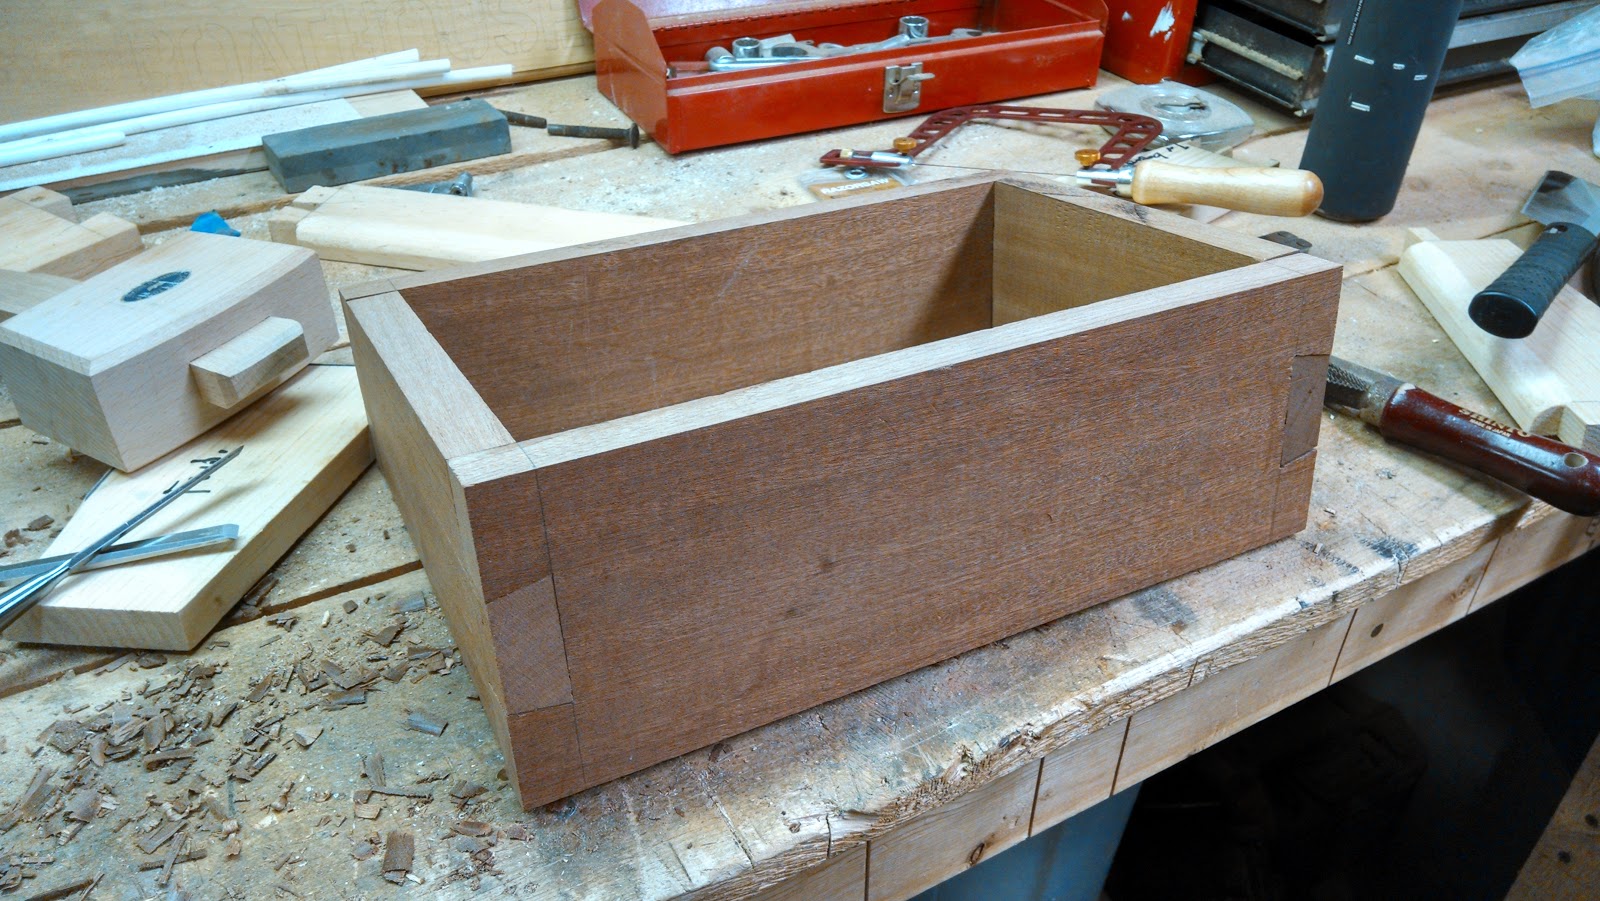
In any event, I decided to heed the warnings and let the rudder cure fully.  So I moved on to building some dorade boxes for the cabintop. The boat actually has some molded fiberglass ones in place already, but I always wanted to make some nice wood ones that would hide the ugly fiberglass.  When I bought the boat, the original bronze cowls had been replaced by plastic ones that were butt ugly but the previous owner was kind enough to give me the original bronze ones in a big bag of goodies.  They still need to be cleaned up, but I'll be using them for the new boxes.

I have been saving a bit of leftover sapelle from the new caprails and put it to use for this project.  I started out by building one from pine before cutting up the good wood.  Since I'm simply building covers for the existing fiberglass vents, I wanted to get the fit just right and there are a bunch of odd angles and curves that made it a bit tricky.  Once I had it right I took apart the pine box and transferred the dimensions to the sapelle and cut it out.

It had been a while since I hand cut dovetails, but I put my new chisels (birthday present) to good use and I'm happy with the results for the first box.  I still have a lot to do on this before it's done, but it was nice to be able to post about something that only required sawing and chiseling and no epoxy for a change.


Monday, March 24, 2014

Sanity Check

A few days ago, I realized that I screwed up where I cut the pockets for the drift pins.  When I measured the distance to cut the pockets from the leading edge of the rudder, I didn't take into account the width of the shaft so as a result, all but one of the pins extend into the pockets only about 1/2 inch.  Technically enough, but I wanted the washers and nuts to sit on a nice flat piece of wood so I planned to glass in some hardwood pieces and the 1/2 inch just wasn't enough room.

I was planning originally to use some leftover sapelle holesaw cut outs from my grabrail project, but because the drift pins only extended about a half inch into the pocket, there wasn't enough room except for 1 of the holes (I don't know how I cut that one correctly and all the others were off).  So I basically made a dutchman patch at the bottom of each pocket and epoxied sapelle blocks in for the plywood I cut out.  All in all it achieved what I had intended, but it took more time than I had originally planned and I'm still kicking myself for not paying more attention to my measurements.

I left the rudder for a few days to let the epoxy cure and then bolted on the lower shaft and took everything (including the upper shaft) back over to the boat yesterday afternoon for a finally sanity check fitting before starting to glass the rudder up.  Assembling this in place is a bit of a trick and is probably best done with 3 people, but I just had my wife to help me.  The process goes like this:

  1. Insert stainless shaft up and into boat.  This is where a third person would be good to have to just hold it in place while the other steps are done.
  2. Take rudder and lower shaft and insert into bronze shoe pin at base of keel.  
  3. Wiggle rudder in between welded straps on top of shaft. 
  4. Insert upper drift bolt and tighten nut. 
The final fitting will include bolting straps through the rudder and bolting lower strap around bronze shaft, but I have a lot of epoxying to do in the meantime.
Anyway, I'm happy to report that my measurements are just about spot on and I think things are all going to work out very well.  One of the only things that were off was that one of the welded straps on the shaft binds up when the rudder is turned to a great degree.  I will have to grind out a small area on the keel side of the rudder to accommodate, but can be done easily in about 10 minutes with a rasp.  I'll also have to trim down the rudder tube extending into the cockpit to make room for the tiller head, but I had actually planned to keep the rudder tube a bit on the long side until I figured out the final dimensions of the new shaft.  

Next up, I'll be applying a coat of CPES to the entire rudder before I do the actual glassing.  It may be overkill, but I've heard it makes a good substrate for epoxy to adhere to and ultimately, there is no way I'll keep the water out forever, so this should provide a last line of defense against water intrusion.  

Friday, March 21, 2014

Spring to Action

I haven't been able to turn my full attention to the rudder build yet (22" of new snow and Mad River Glen was begging to be skied), but I'm starting to gather momentum.  Another 5" last night did not help with motivation for my more liquid pursuits, but now that it's officially spring I think it's time to put the skis away (well, mostly).

A few nights back I epoxied the 2 halves together.  I mixed up a batch of unthickened epoxy and coated both halves and the channels I cut for the drift bolts.  I let that soak in a bit and then mixed up a set 3/8" PEX tubing (waxed with butchers paste) into the channels on one of the halves.  Then I mixed up a slightly thickened batch (Aerosil) and troweled in on with a 1/8" notched spreader.  Carefully I stuck the 2 halves together and screwed it together with sheet rock screws and fender washers.   I pulled the tubing the next morning and then let the whole thing cure for a few days before pulling the sheet rock screws.

Next I set up the saw horses outside and took the belt sander to the trailing edge to get a bit of a foil shape. I'm really not performance oriented so I didn't go crazy with the shaping.  If I cared about eeking out every bit of speed I could, I would have gone all NACA on the rudder.  Of course, if speed really mattered to me I probably wouldn't be fixing up a beat up old Alberg.  The nice thing about plywood (especially good marine plywood) is that the plys act as a really nice visual fairing guide when trying to shape something.

Yesterday afternoon I had a bit of time so I bolted on the lower part of the shaft to the rudder and my son and I went over to the boat for a partial test fitting.  I say partial because I didn't fit the top half of the shaft but plan on doing that this weekend.  Yesterday was more of a sanity check to make sure I was on the right track. Fortunately, I was and didn't see any major adjustments in shape that will have to be made.  This weekend's full test fit will show me what final adjustments will need to be made before I glass the whole thing up.


Sunday, March 9, 2014

Channel Cutter

Continuing with the rudder build today I did a test fit of the basic rudder shape on the boat and marked the location of the drift pins on the lower rudder shaft.  Once I had those marked off I laid out guide boards for the router with a 3/8 inch channel bit.  The guides are offset by 2 - 26/32 and it was important to get them correct on both halves of the rudder.  I screwed down the guide board and starting from the middle, cut a channel in each half of the rudder.  The total depth of the rudder determined the length of each channel.  So, I ended up cutting 2 - 5" channels, 1 - 12" channel, and 2 - 16" channels.

Once all the channels were cut, I screwed both halves of the rudder together with temporary screws and cut out the ends of each channel with a 2.5" hole saw.  These holes will form the pockets where the washers and nuts fasten the drift pins.  I ordered those today and hope to see them by the end of next week.


Saturday, March 8, 2014

Ruddery Goodness

I've finally managed to free myself from the grips of winter and got back to work on some of the projects that need to be done.  There's still a lot of snow on the ground and it's too cold to work in the boatshed so I'm confined to the shop, but at least it's warm.

I stopped in at Goosebay sawmill last week and bought a sheet of 18mm Meranti marine plywood for the new rudder build ($155.00).  I went back and forth on whether or not to go traditional with solid mahogany planks or encapsulated plywood.  Ultimately, I chose plywood because I didn't feel comfortable enough with the movements of swollen planks and how to deal with it.  I've tangled with the properties of wet/humid wood on a number of occasions with tables and cabinets I've built, and it is really tricky to get it right.  I figured I didn't want to mess around with something as important as the rudder so I went with plywood which will be dimensionally more stable (especially once encapsulated).  The design will use two pieces of 18mm Meranti epoxied together to make a thickness of just under 1.5".

I had picked up my newly fabricated rudder post back in December and it had been sitting in my shop waiting for action.  Once I had the plywood I ripped it in half (lengthwise) and used the old rudder to trace the shape onto it.  Fortunately the maximum witdth of the old rudder is only 23" or I would have needed two sheets of plywood instead of one.

Using a saber saw, I cut proud of the traced line and then screwed on a piece of plastic laminate to create a fair arc.  I mounted a flush cut bit to the router and used the laminate as a guide to make a perfectly smooth arc along the trailing edge of the first piece of plywood.

On the front edge of the rudder where the propeller aperture is located and the post attaches, I carefully cut along the line and cleaned it up with a rasp to make sure the new rudder post would attach with the proper angle.

When I was satisfied with the shape and fit of the first piece of plywood I screwed it down to the second piece and rough cut it to the basic shape of the first using the saber saw.   I broke out the router and flush cut bit again and cut out a copy of the first.

Now that I had 2 identical copies of the rudder I could focus on setting a cove into leading edge of both pieces so the rudder post can nest into the cove once the 2 pieces are epoxied together.  The router saved the day again; using a 3/4" radius cove bit I cut a cove on each half of the rudder.  I had to shape a guide board for the aperture area for the bit that took a bit of time, but overall the process went smoothly.  I temporarily screwed the pieces together to make sure both the new and the old bottom shaft fit.  It was just about perfect.  Tomorrow, I'll make a test fit on the boat just to make sure the shafts line up properly before I cut the channels for the drift pins that will be sandwiched in the rudder.